Friday 6 December 2013

window (server) suppress shutdown button in start menu all users registry edit

We've all been there....
 accidentally clicking shutdown rather than logout (on a server) (especially when we are in a rush).
well here's a quick fix, put the below in the registry and then logout and back in and hey presto, no more shutdown button. (obviously you can still shut the system down, you just have to use the command line instead.)


Key Location: HKEY_LOCAL_MACHINE\Software\Microsoft\Windows\CurrentVersion\Policies\Explorer
Type: REG_DWORD
Name: NoClose
Value: 1

Wednesday 4 December 2013

Ubuntu + Active Directory, enable normal users to edit network settings

I recently setup a Ubuntu Linux system using likewiseopen for AD integration, however I found that normal users (even if they had sudo rights) had the edit network connections options grayed out on the gui.

This however I found can be easily fixed by doing the following

edit: /var/lib/polkit-1/localauthority/10-vendor.d/com.ubuntu.desktop.pkla

and change:

[Adding or changing system-wide NetworkManager connections]
Identity=unix-group:admin;unix-group:sudo
Action=org.freedesktop.NetworkManager.settings.modify.system
ResultActive=yes

to:

[Adding or changing system-wide NetworkManager connections]
Identity=unix-group:admin;unix-group:sudo;unix-group:users
Action=org.freedesktop.NetworkManager.settings.modify.system
ResultActive=yes

Then in the terminal (using an account with sudo rights) do the following

sudo adduser ADOMAIN\\Ausername users

Where ADOMAIN is your domain name ie. if your FQDN is AD.linuxisgreat.com then you would put AD in place of ADOMAIN.

eg.

sudo adduser AD\\bsmith users

Finally logout and then login the changed account and the option to change network settings should now be active from the network icon in the system menu bar.

Tuesday 29 October 2013

Power and Pi

Recently I purchased a raspberry pi to replace the rather aged and (compared to the Pi) power hungry Asus EEE box that monitors the UPS for my home server cluster.
Its worth mentioning that the EEE box used to host VMs as well, but its lack of resources (max 2 GB memory), eventually lost it that roll, in favor of other atom mini-boards that can handle 8GB memory etc.

The new

The old

Setting up the pi was quite straightforward as the Raspberry pi site http://www.raspberrypi.org/downloads has a downloadable OS installer/recovery image that you can write the SD card (that will hold the pi's OS).
Despite the quirky name (NOOBS) New Out Of Box Software, is actually a very good, well put together bit of software. The lite version is best as it takes the least space on the card and it provides and easy recovery path (hold shift during boot) to restore the system to a fresh clean build with out having to remove the SD card from the pi box/case should anything ever go wrong.
(Note the lite version of NOOBS is a net-installer which means the pi must be connected to the internet to install / restore an OS)

The OS I chose for this pi was Raspbian, Debian OS build created specifically for the pi. This was chosen as Debian was known to have arm builds of all the software I needed to keep an eye on the UPS.

I won't go into the install process here (there are plenty vids and documents on the web regarding this) but the instructions I based my UPS monitoring setup for the pi are available at http://raspisimon.no-ip.org/ups.php
(note I have no affiliation with the sites linked in this post I just made use of them)


Sunday 15 September 2013

Pwnboxer and WoW 5.4 : Siege of Orgrimmar. Game windows not on correct monitors

Today I tried to get pwnboxer to run WoW 5.4, and run it did .... just not on the correct monitor(s) (all the game windows got piled up on top of one and other).

However a quick investigation turned up the cause of the issue. As of patch 5.4 WoW no-longer seems to respect the run in 32bit mode option Pwnboxer sends to it (something Pwnboxer currently needs it to do).

Rather it looks at your OS and goes 'oh this is a 64bit pc I'll use the 64bit client' even though it has been asked to run the 32bit client.

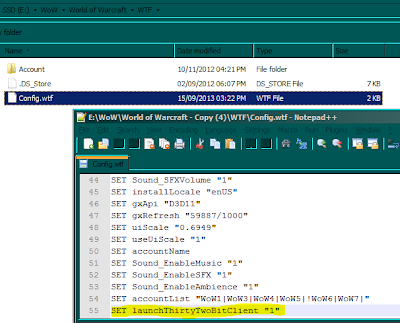
The fix to this however is quite simple first go to the 'WTF' directory under the wow directory and look for the 'Config.wtf' file, then add/amend the line below
SET launchThirtyTwoBitClient "1"


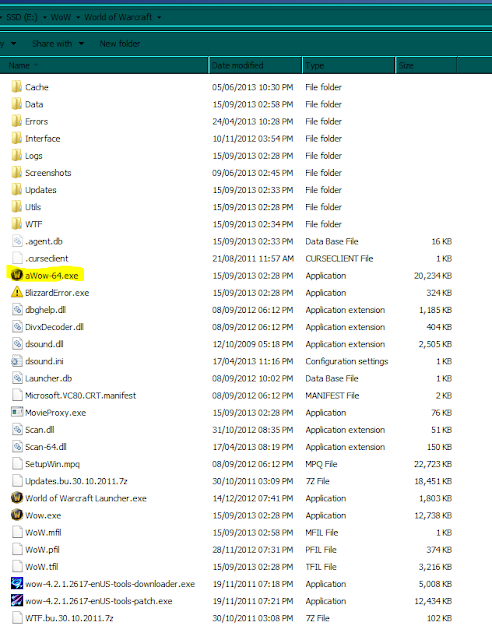
Then go to the main wow directory and rename the 64bit client from 'Wow-64.exe' to 'aWow-64.exe' that will stop the launcher trying to load it.


For more info, see the official forum post about the problem


Xsplit system sound not recording

Well this was an odd one. Today I tried to get Xsplit to record system sounds aka the sounds a game plays over the speakers etc. but it failed to do so. Mic input worked fine when tested so I had a deeper look into the issue.

It turns out that the latest patch for Xsplit did something odd to its response to being muted in the system sound panel. Rather than muting the app (xsplit) like it should, it muted the system sound input to Xsplit instead. So as a result you have to keep the app un-muted to make it work properly.


Sunday 1 September 2013

Final Fantasy XIV: a realm reborn, pointers/advice

Recently I purchased Final Fantasy XIV and I have to say its a impressive game (just have a look at the graphics it has. see this Link)

However having played it for several hours I came to turn in a quest but it had a grayed out complete button, this had me thinking I had missed something in the quest and so I went back and followed the quest through thoroughly end to end and found .... nothing, I had not missed a thing apart from the fact that the quest turn in had ... options for a reward, but being that I have my system set at a high resolution and the text was small and a similar colour to the popup background, I missed the 'options' label entirely.

(see screen grab below so you don't miss it ;-P ,
note I have highlighted the sections so they are easy to spot )


also whatch out for things like dye or Materia vendors as these will be no good to get anything from until you have the correct crafting skills to use them unlocked (this differs from dyeing things in Rift or geming items in WoW so if you come from either of those games you will be easily caught out). 
Also on the point of differences, whilst you can buy things directly from the market boards in each main city you don't appear to be able post items directly to them (like you can in Rift or WoW) instead you have to use a 'retainer' these NPCs can be unlocked via the  'retainer representative' NPC but ..... only if you have enough rep with that city.

I hope that this post helps some of you out. 

Friday 16 August 2013

Untangle 2nd LAN + VF SS = Fail

Looks like Untangle does not support IP-SEC connections over secondary interfaces (at lease in the free version, I don't know if it does for the payed support version) and as a result I could not get my Vodafone Sure Signal to work with it on the secondary connection (it worked on the main one but who wants a unknown black box appliance with a remote control VPN just sitting in with everything else).

In the end I worked around this problem by adding a pfsense firewall to the network and letting it handle the splitting of the networks / dhcp stuff then hanging the untangle instances off that (one for the main net, one for the guest net and none for the FV SS net (no point as its on its own and is picky about things)

Sunday 11 August 2013

Untangel bridge mode + VMware ESXi

So recently I tryed to get untangle working in transparent bridge mode as a VM under ESXi but I could not get packets flowing from the lan to the wan sides, or even from the lan side to the untangle. However the untangle vm itself could see the internet ... strange hmm.

Well after much googleing I found the cause of the issue. It turns out that in bridge mode the untangle needs full network card functionality and hence you have to enable 'promiscuous mode' on the virtual switches associated with the LAN and WAN ends of the untangle vm. The ESXi Vswitches 'promiscuous mode' defaults to disabled.


The above shows where the setting is once you get to the virtual switch list (Configuration > Networking).

Hope this will be of help to someone ;-)

Monday 5 August 2013

Yoga 13, Stop that Buzzing !!!

Over the past few months of owning a Lenovo Yoga 13, I have been plagued by a loud buzz from its fans every time I hold it on an angle or even vertically (in tablet mode).
Now having a bit of time to hand (and also having got thoroughly sick of the buzz) I have sorted it and the fix is surprisingly easy to do.

The first step is to take out the keyboard (this is easy to do and there are plenty youtube vids on this).

Step two is to relieve the left had fan casing a little bit, (if you shine a flashlight across the fan housing you will see a faint curved line following the curve of the fan hole on the left hand side of the left fan (looking at the unit with the memory module on the left).
To do this you need to bend the fan housing up about 1/2 to 1 millimeter, around the left side of the left fan, following the faint line you will see on the fan casing.


This problem seems to be a manufacturing defect, maybe the construction system that puts the laptops together presses just a little to hard when putting the fan bit (or some other part) in and thus bends the fan housing

All in all I am now quite pleased with the buzz-lessness of the unit ;-)

Note. If you do this for your unit and break something in the process, I can NOT be held accountable for your actions or the breakage, this worked for me but may not for you.

Thursday 25 July 2013

multi dhcp range on Untangel / Vodafone Sure Signal


So this evening on my way home from work I purchased a 'Vodafone Sure Signal' unit to sort out the phone signal coverage problem I have for Vodafone.

Upon reading through the manual it turns out that the Sure Signal configures itself from what Vodafone tell it when it connects to them over the web and then all management of the device is done via the Vodafone website, no mention is made to any local management portal for the device (I'll have a look and see if there is one some other time).

Having seen this, I though it best to put it on its own network segment away from everything else (network monkey anyone ?? (hak 5 reference )), probably over cautious of me but better safe than sorry hmm + it gives me chance to practice setting up things for when I add a guest WiFi lan later.

That decided I looked for how to set up the extra dhcp ranges and firewall rules, that lead me to this page on the Untangle site. That nearly completely sorted things for me but I found out that just doing that is not enough.

First, the 'dhcp-range=192.168.5.10.....' commands must come first in the custom DHCP/DNS config field.

Second, the interfaces you want to use for the new dhcp ranges must be configured to match their static IPs to the dhcp ranges
ie. for dhcp range 10.55.1.100-250 the interface's IP needs to be manually set to a compatible address eg. 10.55.1.1 , as this does not happen automatically when you specify the dhcp range.
Also the NAT Policies need the line 0.0.0.0 / 0 adding you do this by just clicking the add button for that section and leaving the result alone (see image below)

Wednesday 24 July 2013

Ubuntu touch (Saucy Salamander)

Ubuntu touch (Saucy Salamander) is getting ever closer to being a fully featured phone/tablet OS.

Currently the phablet tools (you can get them here https://wiki.ubuntu.com/Touch/Install) are not working for 'Saucy' installs. you just get a 404 error on the download phase. (correct as of 11 pm (GMT) 24 Jul 2013).
However this is not a huge problem as (if you have already bootstrapped the device) you can install the 'Saucy' update manually.

Note. Need I say that you do this install entirely at you own risk and by following this post you agree to hold both myself and the people at Ubuntu totally blameless for what ever happens

First run the 'phablet-flash' command from a root level terminal on your Ubuntu pc, this (though it fails to do the install) will give you the device type.

That done you need to download the right images for your device type (you can get them here). The two bits you need are the 'saucy-preinstalled-touch-armel+XYZ.zip' (where XYZ is the device type ie. saucy-preinstalled-touch-armel+maguro.zip) and 'saucy-preinstalled-touch-armhf.zip'

The next thing to do is to get the device specific bit installed, to do this boot the device into recovery mode using 'adb reboot recovery'.
Then push the device spresific bit over to the phone/tablet with the command 'adb push   ./saucy-preinstalled-touch-armel+XYZ.zip /sdcard/autodeploy.zip ' (assuming you are running the adb command from the directory you downloaded the .zip files to)

The device now needs to be rebooted into recovery mode again to install the image, so issue the 'adb reboot recovery' command, this will cause the phone/tablet to reboot and show the 'installing android' animation and progress bar. (
When this is done you may need to put the phone/tablet back into recovery mode manually using the device's specific hardware button combo, before moving onto the next step (this happened to me on the nexus 7))

Now back in the recovery mode on the device its time to push the main OS payload over so issue 'adb push   ./saucy-preinstalled-touch-armhf.zip /sdcard/autodeploy.zip' (again assuming you are running the adb command from the directory you downloaded the .zip files to).

Now to finish up issue the 'adb reboot recovery' command one last time, this will cause the phone/tablet to reboot and show the 'installing android' animation and progress bar again, but this time it will take longer to complete, so sit back and let it do its stuff.

Once the install is complete, the device will restart all on its own and after a couple of moments will show the Ubuntu touch interface.

Congrats you're ready to go.

Remember. To turn off the device you have to use the 'sudo poweroff now' command from the terminal app as the power off buttons have yet to be implemented (but you have to remember this is beta software that gets daily changes/upgrades)

Its worth noting that the normal Ubuntu command line update commands 'apt-get update and apt-get upgrade' can be used from the terminal app to provide on-the-go updates right over the WiFi strait to the phone/tablet, no pc required  

Thursday 18 July 2013

dd where are you upto ?

Just wanted to copy a USB drive to another one this evening (due to upgrading a USB 3.0 unit) and found the dd was taking quite a while (due to the USB 2.0 stick it was coming off, that and the fact the drives were 32GB) and so I looked for a way to see what dd was doing.

It turns out that to get dd to spit out its state you have to do a special trick with the kill command (usually used to stop un-responsive/runaway processes).


To get the info you will need two terminal windows (or you could use screen to hold the dd process).
In one terminal session start the dd process ie. dd if=/dev/sdX of=/dev/sdY.

Then in the other terminal session do this;
Lookup the process id of dd by doing typing in
pgrep -l '^dd$
This will net you the process id of dd, now put the process id in the following command (in this example I got "3479 dd" as the output of "pgrep -l '^dd$")
then type in
kill -USR1 3479
don't miss the -USR1 bit or you will kill the dd session.

each time you use the above command it causes dd to spit out its status into its running terminal session (that's the one you ran dd in at the start of this process), so switch over and have a look, you should see somthing like this
shadow@webX$ sudo dd if=/dev/sdX of=/dev/sdY
0+14 records in
0+14 records out
204 bytes (204 B) copied, 24.92 seconds, 0.0 kB/s
just hop back to the other terminal session and run the kill -USR1 ... command again each time you want to see where its up to