So on the docker site it says that windows 10 is not supported(link), however you can still get it to run, you just need a few apps/settings first.
Software
Virtual box test build
(https://www.virtualbox.org/wiki/Testbuilds)
Virtual box expansion pack (http://download.virtualbox.org/virtualbox/5.0.2/Oracle_VM_VirtualBox_Extension_Pack-5.0.2-102096.vbox-extpack)
Docker Tool box
(https://www.docker.com/toolbox)
Install process
> Install the latest VirtualBox (I used 5.0.x revision 102010)
> Install the expansion pack for VirtualBox
> Install Docker Tool box, ensuring to un-check the install VirtualBox option (you already installed the win 10 working one)
Then just run the 'Kitematic (Alpha)' (more on why not to use 'Docker Quickstart Terminal' later). If the Kitematic app reports it can't connect to the VM then more likely than not the docker VM did not start as it should have (this happened to me).
If so open VirtualBox and double click on the 'default' docker VM to bring up the management frame for it, more likely than not you will get an error about like "VT-x/AMD-V hardware acceleration is not available on your system. Certain guests (e.g. OS/2 and QNX) require this feature and will fail to boot without it."
This happens when VirtualBox can't use the hardware virtualization capabilities of the host system, most systems have either VT-x or AMD-V, you can check this by looking on the 'performance' tab of the task manager if you see 'enabled' next to you have the needed hardware.
In my case it was Microsoft Hyper-V that was holding on to the VT-x resource so I un-installed the Hyper-V platform module from my system, rebooted then VirtualBox worked fine with full VT-x functions available.
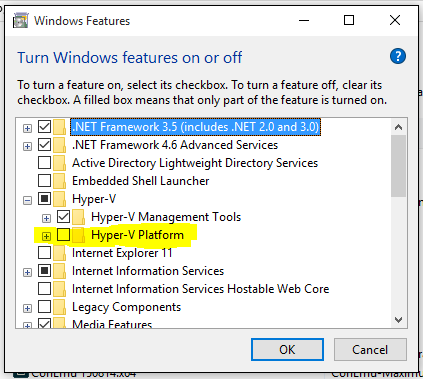
Further info regarding how to setup a shell (ps or cmd) to interact with docker can be found here or you can just run 'Kitematic (Alpha)' and then have it spawn a configured powershell interface for you, it can even spin-up the VM for you as well and I recommend you do created the VM via Kitematic as it seems to do a better job at sorting out connection certs then the 'Docker Quickstart Terminal'
Finally what how-to document would be complete without a 'proof of working state' image so here you go
Sunday, 16 August 2015
Sunday, 12 April 2015
ComputerCraft - lua tables
So recently I started looking into ComputerCraft (a Minecraft mod) and thus had to start learning lua code.
The first problem I came across was with tables, more specifically inserting extra values into them.
eg
local caches = {}
caches.insert(caches,v)
where v was a value from a loop I had the program iterating through
however I kept getting the error "attempt to call nil"
so.. what was I doing wrong?
The example was basing the code off was
local Table = {"One"}
table.insert(Table, "Three")
things learned were
1> Instantiated variables do not take on the properties of their type (un-like some other languages)
2> lua is fully case sensitive throughout
so the solution to all the problems was ... that 'table' was a base function, not an instantiated variable having a function of insert()
so changing ' caches.insert(caches,v) ' to 'table.insert(caches,v)' fixed the problem
The first problem I came across was with tables, more specifically inserting extra values into them.
eg
local caches = {}
caches.insert(caches,v)
where v was a value from a loop I had the program iterating through
however I kept getting the error "attempt to call nil"
so.. what was I doing wrong?
The example was basing the code off was
local Table = {"One"}
table.insert(Table, "Three")
1> Instantiated variables do not take on the properties of their type (un-like some other languages)
2> lua is fully case sensitive throughout
so the solution to all the problems was ... that 'table' was a base function, not an instantiated variable having a function of insert()
so changing ' caches.insert(caches,v) ' to 'table.insert(caches,v)' fixed the problem
Sunday, 13 July 2014
Raspberry pi + PiTFT Mini Kit - 320x240 2.8" TFT+Touchscreen
After some research and some help from notro, I'v finally gotten my raspberry pi up and running fully with the Adafruit PiTFT Mini Kit, using notro's 3.12.21+ #1 PREEMPT kernel.
This means that I have full support for the wifi chips I needed to use and really early activation of the fbtft screen (good for seeing if there are any boot time errors).
In the end i used the following process.
(note some extracts taken verbatim from notro's site)
Install rpi-update
rpi-update is used to install this kernel.
It must have REPO_URI support (auto updating doesn't work, since it overwrites the REPO_URI variable):
Install the kernel
Enable modules to drive the screen hardware
edit /etc/modules
and add/uncoment the following lines
edit /boot/cmdline.txt
and add the following
Configure touchscreen
this can be done by using the Adafruit guide at their site so I won't reiterate it here.
Controlling the backlight
Backlight control outside of FBTFT
----------------------------
and that's it.
hopefully this will give you the necessary pointers to get this up and running for yourself
This means that I have full support for the wifi chips I needed to use and really early activation of the fbtft screen (good for seeing if there are any boot time errors).
In the end i used the following process.
(note some extracts taken verbatim from notro's site)
Install rpi-update
rpi-update is used to install this kernel.
It must have REPO_URI support (auto updating doesn't work, since it overwrites the REPO_URI variable):
sudo wget https://raw.github.com/Hexxeh/rpi-update/master/rpi-update -O /usr/bin/rpi-update && sudo chmod +x /usr/bin/rpi-update
Raspian: Remember to expand the filesystem if you haven't done so
sudo raspi-config
Raspian: Remember to enable SPI if needed
# remove or comment out the spi blacklist line
sudo nano /etc/modprobe.d/raspi-blacklist.conf
Install the kernel
FBTFT drivers built into the kernel proper
sudo REPO_URI=https://github.com/notro/rpi-firmware BRANCH=builtin rpi-update
sudo reboot
edit /etc/modules
and add/uncoment the following lines
spi-bcm2708 i2c-bcm2708 i2c-dev stmpe_device cs=1 chip=stmpe610 blocks=gpio,ts irq-pullup irq-gpio=24 irq-base=330 sample-time=4 mod-12b=1 ref-sel=0 adc-freq=2 ave-ctrl=3 touch-det-delay=4 settling=2 fraction-z=7 i-drive=0 gpio_backlight_device gpio=252
and add the following
fbtft_device.name=pitft fbtft_device.rotate=270 fbtft_device.speed=48000000 fbtft_device.fps=50 fbtft_device.debug=0 fbtft_device.verbose=0 fbcon=map:10 fbcon=font:8x8
Configure touchscreen
this can be done by using the Adafruit guide at their site so I won't reiterate it here.
Controlling the backlight
# Turn off backlight
echo 1 | sudo tee /sys/class/backlight/*/bl_power
# Turn on backlight
echo 0 | sudo tee /sys/class/backlight/*/bl_power
Brightness is currently not supported (need a kernel PWM driver for the Raspberry Pi).
Wiring Pi can be used to dim the backlight.
gpio -g mode 18 pwm
gpio -g pwm 18 1023
and that's it.
hopefully this will give you the necessary pointers to get this up and running for yourself
Raspberry pi time on screen
Ever wanted to have the time show on the console all the time?
Well there's an easy way to do it.
just edit
Well there's an easy way to do it.
just edit
/etc/kbd/configand enable
DO_VCSTIMEat the end of the file
Monday, 14 April 2014
Windows 8.1 "Browser Choice" KB976002 & how to suppress an install of it
Recently I was updating some windows 8.1 systems and despite having un-selected and hidden the "Browser Choice" KB976002 update it applied anyway ?!?!?!?!
(Edit : I found out why it installed any way. In windows 8 you have to make sure that you deselect unwanted updates in both the 'Control Panel'->'Windows Update' (classic desktop) & 'Settings' ->'Change PC settings'->'Update and Recovery' (Tile UI) before allowing the updates to apply)
ok, I thought, I'll just apply the registry disable key
HKEY_LOCAL_MACHINE\Software\BrowserChoice\Enable=0
('Enable' is a DWORD )
and as it should that got rid of the desktop icon etc. ..... however it did not get rid of the "browser choice" tile on the start screen.
after much searching and googleling around I finally found the solution. you just have to remove the shortcut to it in
C:\ProgramData\Microsoft\Windows\Start Menu\Programs
(Edit : I found out why it installed any way. In windows 8 you have to make sure that you deselect unwanted updates in both the 'Control Panel'->'Windows Update' (classic desktop) & 'Settings' ->'Change PC settings'->'Update and Recovery' (Tile UI) before allowing the updates to apply)
ok, I thought, I'll just apply the registry disable key
HKEY_LOCAL_MACHINE\Software\BrowserChoice\Enable=0
('Enable' is a DWORD )
after much searching and googleling around I finally found the solution. you just have to remove the shortcut to it in
C:\ProgramData\Microsoft\Windows\Start Menu\Programs
Friday, 6 December 2013
window (server) suppress shutdown button in start menu all users registry edit
We've all been there....
accidentally clicking shutdown rather than logout (on a server) (especially when we are in a rush).
well here's a quick fix, put the below in the registry and then logout and back in and hey presto, no more shutdown button. (obviously you can still shut the system down, you just have to use the command line instead.)
Type: REG_DWORD
Name: NoClose
Value: 1
accidentally clicking shutdown rather than logout (on a server) (especially when we are in a rush).
well here's a quick fix, put the below in the registry and then logout and back in and hey presto, no more shutdown button. (obviously you can still shut the system down, you just have to use the command line instead.)
Key Location: HKEY_LOCAL_MACHINE\Software\Microsoft\Windows\CurrentVersion\Policies\ExplorerType: REG_DWORD
Name: NoClose
Value: 1
Wednesday, 4 December 2013
Ubuntu + Active Directory, enable normal users to edit network settings
I recently setup a Ubuntu Linux system using likewiseopen for AD integration, however I found that normal users (even if they had sudo rights) had the edit network connections options grayed out on the gui.
This however I found can be easily fixed by doing the following
edit: /var/lib/polkit-1/localauthority/10-vendor.d/com.ubuntu.desktop.pkla
and change:
[Adding or changing system-wide NetworkManager connections]
Identity=unix-group:admin;unix-group:sudo
Action=org.freedesktop.NetworkManager.settings.modify.system
ResultActive=yes
to:
[Adding or changing system-wide NetworkManager connections]
Identity=unix-group:admin;unix-group:sudo;unix-group:users
Action=org.freedesktop.NetworkManager.settings.modify.system
ResultActive=yes
Then in the terminal (using an account with sudo rights) do the following
sudo adduser ADOMAIN\\Ausername users
Where ADOMAIN is your domain name ie. if your FQDN is AD.linuxisgreat.com then you would put AD in place of ADOMAIN.
eg.
sudo adduser AD\\bsmith users
Finally logout and then login the changed account and the option to change network settings should now be active from the network icon in the system menu bar.
This however I found can be easily fixed by doing the following
edit: /var/lib/polkit-1/localauthority/10-vendor.d/com.ubuntu.desktop.pkla
and change:
[Adding or changing system-wide NetworkManager connections]
Identity=unix-group:admin;unix-group:sudo
Action=org.freedesktop.NetworkManager.settings.modify.system
ResultActive=yes
to:
[Adding or changing system-wide NetworkManager connections]
Identity=unix-group:admin;unix-group:sudo;unix-group:users
Action=org.freedesktop.NetworkManager.settings.modify.system
ResultActive=yes
Then in the terminal (using an account with sudo rights) do the following
sudo adduser ADOMAIN\\Ausername users
Where ADOMAIN is your domain name ie. if your FQDN is AD.linuxisgreat.com then you would put AD in place of ADOMAIN.
eg.
sudo adduser AD\\bsmith users
Finally logout and then login the changed account and the option to change network settings should now be active from the network icon in the system menu bar.
Subscribe to:
Posts (Atom)