Saturday, 27 September 2025

macOS 26 (25A354) - Desktop Icons refuse to go to in the top left of desktop

So recently I upgraded my mac mini to macOS 26 (Tahoe), and I noticed that the icons I had in the top left of my screen had been pushed over to the middle of the display. 
Initially, I assumed it was just a defaults/layout reset, but when I tried to put them back they just got pushed back out the moment I let go of the icon.


This set me going down the rabbit hole of removing .DS_Store files and resetting plists ... all to no avail.
Searching online did not seem to turn up any results, so as an investigation I made a new user account on the system, logged in and what did I see in the top left ... the default widgets, couldn't be that I thought as I went to the settings to turn off widgets, but sure enough the same behavior persisted; so I turned widgets back on, removed the bottom one and turned them back off, and what do you know ... it let me put the icons in that space vacated by that widget now.

So if you come across this issue; the fix is reenable widgets in your settings, remove them and then turn off widgets again ... who knows why its like that in 26 (as it was not in any of the earlier versions), but it seems that either by bug, or by intent, that space is reserved the widgets now even if they are turned off (so the only option is to fully remove them)

Sunday, 2 February 2025

Virtual Box + USBpcap = BSOD

Recently, I encountered an issue where by every time I plugged in or unplugged a USB device when VirtualBox was running (no need for a VM to be up just the main VirtualBox app), then my system would blue screen.

Having looked into the issue at length, I came across a post online about the potential for other system/low level USB system hooking drivers, to casue issues with the VirtualBox USB monitor driver. This set me reviewing recent system changes and looking through that list, I noted I recently installed the full Wireshark package (all features) and that has a lowlevel USB driver in it. So to check if this was the source of the conflict I removed that (including the USBpcap component) and the issue cleared up.

The only conclusion I can come to is that there is some kind of conflict between the two drivers, so for now the plan is to not install USBpcap on any host that has VirtualBox on it.

Saturday, 4 May 2019

AWS - S3 + CloudFront + AWS Certificate Manager = http + https site (or redirect)

To host a static page in an S3 bucket with https you need to use 'Certificate Manager' in the N.Virginia zone or the certs it makes will not be detected/usable in cloudfront

While the certs are being generated/validated, pop over to the 'S3 Management Console' and make a bucket that has the same name as the domain you want to host the site/redirect on. Once the bucket generates go to the properties tab of the bucket and click on the tile labeled 'Static Web Hosting' and enable it by filling out the requested info and clicking save.

Once you have the bucket ready and the certs have been generated/validated, you can then go to the 'CloudFront Management' page. From here click 'create distribution' and then the 'get started' button on the 'web' section.
Select your S3 bucket in the 'Origin Domain Name' box, then select restrict bucket access and then create new identity and name the id as you see fit.
Select 'Yes, Update Bucket Policy', to get the config wizard to sort the needed access to the bucket.
Set Viewer Protocol Policy to 'Redirect HTTP to HTTPS'.
Set Alternate Domain Names (CNAMEs) to match your domain.
Set SSL cert to custom and select your cert generated/issued by Certificate Manager

Ensure 'Custom SSL Client Support' is not set to Legacy Clients Support ..... unless you want a $600/month extra charge on your bill

Set Security Policy to TLSv1.2_2018
click create distribution and then wait for the page to say it is in 'deployed' state


Note: if your pages are not loading or you get a error along the lines of
<Error>
<Code>AccessDenied</Code>
<Message>Access Denied</Message>
<RequestId>689B26545A8F9DC0</RequestId>
<HostId>
bv5SHfYTOu6wjgFGJHa0qhNAUDVSrcMth1ZJ1l/TFVuiSd2dRBNlsGBIxcw8P6/6
</HostId>
</Error>
Its most likely that your S3 buckets are not correctly linked up, to check this get the S3 bucket URL from the 'Static website hosting' section of your bucket's properties page and compare it to what is set in the 'CloudFront Management' page for the distribution you created.

Saturday, 27 April 2019

Plex Remote access - Why do you say disabled = error

So this has been bugging me for some time now, but for some reason Plex considers 'Remote Access' being disabled as an error and 'decorates' the remote access menu entry in the settings menu with a red exclamation point eg.


Now, I could understand it showing an error flag there if it was enabled and not able to contacted by the Plex cloud connection test servers, but come on showing it as an error coss its turned off that's just plain wrong

I have searched all over the place to find an article on how to stop this behavior, but all I could find were people having issues with
A> trying to turn on remote access
or
B> people trying to turn off remote access


So I decided to look into the matter myself, and finally found the file responsible for the colour of the icon, this is at a path like this  ' /usr/local/share/plexmediaserver-plexpass/Resources/Plug-ins-4610c6e8d/WebClient.bundle/Contents/Resources/chunk-2-4a32fe3f94e5216b5ceb-plex-3.95.2-25e2ffd.css '
now this file is compacted, which makes it a pain to read through but using search you can find the icon's html ids in the file, they all begin with 'RemoteAccessStateIcon-' and are all clustered together one after the other in the file

So the 'fix' is to make all the icons 100% transparent by setting their hex codes to ' #00000000 ', thus rendering them invisible on the page

Note 1. If you apply this fix you will have to re-apply it every time you update Plex ... and the path will change, but it should be of the same form.

Note 2. I did also find the .js file responsible for putting the icons there in the first place, but all my attempts at editing that resulted in the webpage not loading, for reference that file is at the path
'/usr/local/share/plexmediaserver-plexpass/Resources/Plug-ins-4610c6e8d/WebClient.bundle/Contents/Resources//js/chunk-2-4a32fe3f94e5216b5ceb-plex-3.95.2-25e2ffd.js'
and again this file has had all the newlines etc stripped out of it, making it hard to understand

Tuesday, 3 July 2018

Updated : Proxmox pve 5.2-5 (and Proxmox 6.x) disable subscription nag

In Proxmox pve 5.2-5 (and Proxmox 6.x) the location of the file that renders the subscription notification has changed.

It is now '/usr/share/javascript/proxmox-widget-toolkit/proxmoxlib.js'

To disable the message locate the line

" if (data.status !== 'Active') { "

 and comment it out, then add the line

"  if (false) { "

 directly below the one you just commented out.

The section will look like this 


var data = response.result.data;
               //if (data.status !== 'Active') {
               if (false) {
                   Ext.Msg.show({
                       title: gettext('No valid subscription'),

This will not magically give you a full subscription, but it will stop the message popping up

Sunday, 22 April 2018

Samsung Android 8.0, How to disable Bixby

Finally after having to use 3rd party apps to suppress Bixby for many many months, I have found a way of disabling it which :-

A > does not need a Samsung account
B > does works even on the latest update (as of 22/4/2018)
C > persists across reboots
D > does not require a 3rd party app
E > does not need root access

the process is as follows,

1> connect to the device over adb from your computer (note you need adb tools for this https://developer.android.com/studio/releases/platform-tools.html)

2> access the device shell (adb shell)

3> disable the apps with the following commands
      pm disable-user com.samsung.android.bixby.agent
      pm disable-user com.samsung.android.bixby.es.globalaction
      pm disable-user com.samsung.android.bixby.wakeup
      pm disable-user com.samsung.android.bixby.plmsync
      pm disable-user com.samsung.android.bixby.voiceinput
      pm disable-user com.samsung.systemui.bixby
      pm disable-user com.samsung.android.bixby.agent.dummy

Bixby should no longer open when pressing the button on the side of the phone

Wednesday, 5 July 2017

Windows server 2008 R2 and OSCP

So I was working on cleaning up some CAs and subCAs recently and came across this interesting bit of info.
An Online Responder can be installed on any computer running Windows Server 2008 R2 Enterprise, Windows Server 2008 R2 Datacenter, Windows Server 2008 Enterprise, or Windows Server 2008 Datacenter
so whilst a CA won't stop you / warn you about enabling OSCP links in the AIA section, it will only work if the specified http:// link defined in the AIA section is hosted on a ENT or DC version of server 2008 R2, and if you enable OSCP via the link then various systems will take that as preferred then fail if the responder service is not running.

ref https://technet.microsoft.com/en-us/library/cc725937%28v=ws.11%29.aspx?f=255&MSPPError=-2147217396

Saturday, 3 June 2017

UniFi / Ubiquiti Networks - How to set managment VLAN for switch

Ever wondered how to configure a UniFi switch to use a different VLAN (1 is the default) for its management interface ?

Well today I ran into that exact problem, the existent management VLAN was 16 so obviously having the switch's management interface on VLAN 1 was no good.

After a fair bit of searching google and the Ubiquiti Networks forums I was beginning to lose hope! , it seemed no one knew how to change it, there was even a feature request post asking for the very feature I was now in need of.

However I persevered and dug through both the CLI of the switch and the cloud key management controller interface until ....... I found the needed option, tucked away under the services heading of the configuration tab of the switch.

so here is an image of it 

I hope this helps some of you out in the future.

Wednesday, 8 February 2017

Remote reboot over IPC

Rebooting remote systems can normally be done using ' shutdown /i ' however this runs in your locally logged in user context.

So what if you want to use a username and password that is not understood by your local system. I came across that issue today and the solution is quite simple ... but you have to know it can be done.

first establish a IPC connection to the target system

NET USE \\<TargetSystemIP/Name>\IPC$ <UserPassword> /USER:<Domain>\<UserName>

then issue the reboot command via that

shutdown /r /t 3 /c " <comment for reboot> " /m \\<TargetSystemIP/Name>

wait a moment and the target system will reboot

Sunday, 2 October 2016

Azue MFA web SDK, server 2008R2 and TLS 1.0

In my last post I mentioned that IIS remote manager does not work if you turn off TLS 1.0.

Well now I've found another, the azure MFA WebSDK and MAF mobile app server both need TLS 1.0 to make them work.

Ref https://azure.microsoft.com/en-gb/documentation/articles/multi-factor-authentication-get-started-server-webservice/

note how MS say nothing about TLS 1.0 being needed on the install page, however it turns out you have to keep both client and server TLS 1.0 protocols enabled on the servers to make it work.

I'm not sure if this is the problem with MFA affects server 2012 R2 as well, but given that the IIS remote manger bug affects all IIS versions up to 8.5 at a minimum I would not be surprised if it did.

Thursday, 29 September 2016

IIS remote managment and TLS restrictions

Recently I came across a strange problem with IIS remote management and TLS/SSL protocol restriction.

I was setting up some IIS servers for use with Microsoft Azure MFA and thus after the basic setup was done I looked to hardening the web interface (well it is for an authentication system) so I turned off all the SSL protocols and also TLS1.0 as they have known vulnerability.

That done I moved on to other tasks and never tried to access the systems via IIS remote manager, until a few days back, when I wanted to check some settings on the MFA webSDK web app I had just added to the systems (note the servers run 2008R2 core thus have no GUI IIS manager on them).

As you can imagine I was some what perplexed that the IIS remote manager would not connect. RDP, powershell, remote mmc connections all worked so why did IIS manager not ?

After quite a lot of searching and getting the correct search terms in line, I found this forum thread.

http://forums.iis.net/t/1230207.aspx?IIS+8+5+Management+Services+and+disabling+TLS+1+0
and it turns out that disabling TLS1.0 breaks IIS remote management, so if you ever get a message like
The underlying connection was closed: An unexpected error occurred
then it may be an idea to check what TLS options are enabled on the server you are trying to connect to.

Sunday, 16 August 2015

Docker on Windows 10

So on the docker site it says that windows 10 is not supported(link), however you can still get it to run, you just need a few apps/settings first.

Software

Virtual box test build
(https://www.virtualbox.org/wiki/Testbuilds)
Virtual box expansion pack (http://download.virtualbox.org/virtualbox/5.0.2/Oracle_VM_VirtualBox_Extension_Pack-5.0.2-102096.vbox-extpack)
Docker Tool box
(https://www.docker.com/toolbox)

Install process
> Install the latest VirtualBox (I used 5.0.x revision 102010)
> Install the expansion pack for VirtualBox
> Install Docker Tool box, ensuring to un-check the install VirtualBox option (you already installed the win 10 working one)

Then just run the 'Kitematic (Alpha)' (more on why not to use 'Docker Quickstart Terminal' later). If the Kitematic app reports it can't connect to the VM then more likely than not the docker VM did not start as it should have (this happened to me).

If so open VirtualBox and double click on the 'default' docker VM to bring up the management frame for it, more likely than not you will get an error about like  "VT-x/AMD-V hardware acceleration is not available on your system. Certain guests (e.g. OS/2 and QNX) require this feature and will fail to boot without it."

This happens when VirtualBox can't use the hardware virtualization capabilities of the host system, most systems have either VT-x or AMD-V, you can check this by looking on the 'performance' tab of the task manager if you see 'enabled' next to you have the needed hardware.


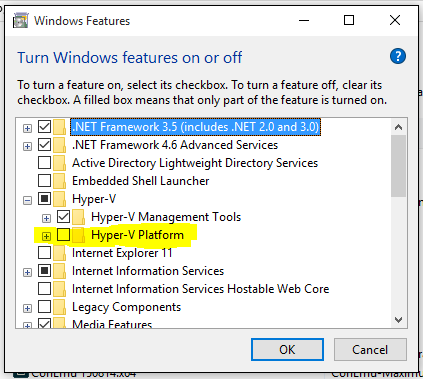
In my case it was Microsoft Hyper-V that was holding on to the VT-x resource so I un-installed the Hyper-V platform module from my system, rebooted then VirtualBox worked fine with full VT-x functions available.


Further info regarding how to setup a shell (ps or cmd) to interact with docker can be found here or you can just run 'Kitematic (Alpha)' and then have it spawn a configured powershell interface for you, it can even spin-up the VM for you as well and I recommend you do created the VM via Kitematic as it seems to do a better job at sorting out connection certs then the 'Docker Quickstart Terminal'

Finally what how-to document would be complete without a 'proof of working state' image so here you go


Sunday, 12 April 2015

ComputerCraft - lua tables

So recently I started looking into ComputerCraft (a Minecraft mod) and thus had to start learning lua code.

The first problem I came across was with tables, more specifically inserting extra values into them.
 eg
local caches = {}

caches.insert(caches,v)

where v was a value from a loop I had the program iterating through

however I kept getting the error  "attempt to call nil"

so.. what was I doing wrong?

The example was basing the code off was

local Table = {"One"}
table.insert(Table, "Three")

things learned were

1> Instantiated variables do not take on the properties of their type (un-like some other languages)
2> lua is fully case sensitive throughout

so the solution to all the problems was ... that 'table' was a base function, not an instantiated variable having a function of insert()

so changing ' caches.insert(caches,v) ' to 'table.insert(caches,v)' fixed the problem

Sunday, 13 July 2014

Raspberry pi + PiTFT Mini Kit - 320x240 2.8" TFT+Touchscreen

After some research and some help from notro, I'v finally gotten my raspberry pi up and running fully with the Adafruit PiTFT Mini Kit, using notro's 3.12.21+ #1 PREEMPT kernel.

This means that I have full support for the wifi chips I needed to use and really early activation of the fbtft screen (good for seeing if there are any boot time errors).

In the end i used the following process.
(note some extracts taken verbatim from notro's site)

Install rpi-update

rpi-update is used to install this kernel.
It must have REPO_URI support (auto updating doesn't work, since it overwrites the REPO_URI variable):
sudo wget https://raw.github.com/Hexxeh/rpi-update/master/rpi-update -O /usr/bin/rpi-update && sudo chmod +x /usr/bin/rpi-update
Raspian: Remember to expand the filesystem if you haven't done so
sudo raspi-config
Raspian: Remember to enable SPI if needed
# remove or comment out the spi blacklist line
sudo nano /etc/modprobe.d/raspi-blacklist.conf

Install the kernel

FBTFT drivers built into the kernel proper
sudo REPO_URI=https://github.com/notro/rpi-firmware BRANCH=builtin rpi-update
sudo reboot
Enable modules to drive the screen hardware

edit /etc/modules
and  add/uncoment the following lines

spi-bcm2708
i2c-bcm2708 
i2c-dev
stmpe_device cs=1 chip=stmpe610 blocks=gpio,ts irq-pullup irq-gpio=24 irq-base=330 sample-time=4 mod-12b=1 ref-sel=0 adc-freq=2 ave-ctrl=3 touch-det-delay=4 settling=2 fraction-z=7 i-drive=0
gpio_backlight_device gpio=252

edit /boot/cmdline.txt
and add the following 
fbtft_device.name=pitft fbtft_device.rotate=270 fbtft_device.speed=48000000 fbtft_device.fps=50 fbtft_device.debug=0 fbtft_device.verbose=0 fbcon=map:10 fbcon=font:8x8

Configure touchscreen
this can be done by using the Adafruit guide at their site so I won't reiterate it here.

Controlling the backlight

# Turn off backlight
echo 1 | sudo tee /sys/class/backlight/*/bl_power

# Turn on backlight
echo 0 | sudo tee /sys/class/backlight/*/bl_power
Brightness is currently not supported (need a kernel PWM driver for the Raspberry Pi).
Backlight control outside of FBTFT

Wiring Pi can be used to dim the backlight.
gpio -g mode 18 pwm 
gpio -g pwm 18 1023
----------------------------

and that's it.
hopefully this will give you the necessary pointers to get this up and running for yourself

Raspberry pi time on screen

Ever wanted to have the time show on the console all the time?
Well there's an easy way to do it.

just edit
/etc/kbd/config
and enable
DO_VCSTIME
at the end of the file

Monday, 14 April 2014

Windows 8.1 "Browser Choice" KB976002 & how to suppress an install of it

Recently I was updating some windows 8.1 systems and despite having un-selected and hidden the "Browser Choice" KB976002 update it applied anyway ?!?!?!?! 
(Edit : I found out why it installed any way. In windows 8 you have to make sure that you deselect unwanted updates in both the 'Control Panel'->'Windows Update' (classic desktop) & 'Settings' ->'Change PC settings'->'Update and Recovery' (Tile UI) before allowing the updates to apply)

ok, I thought, I'll just apply the registry disable key 

HKEY_LOCAL_MACHINE\Software\BrowserChoice\Enable=0
('Enable' is a DWORD )

and as it should that got rid of the desktop icon etc.  ..... however it did not get rid of the "browser choice" tile on the start screen. 

after much searching and googleling around I finally found the solution. you just have to remove the shortcut to it in 

C:\ProgramData\Microsoft\Windows\Start Menu\Programs

Friday, 6 December 2013

window (server) suppress shutdown button in start menu all users registry edit

We've all been there....
 accidentally clicking shutdown rather than logout (on a server) (especially when we are in a rush).
well here's a quick fix, put the below in the registry and then logout and back in and hey presto, no more shutdown button. (obviously you can still shut the system down, you just have to use the command line instead.)


Key Location: HKEY_LOCAL_MACHINE\Software\Microsoft\Windows\CurrentVersion\Policies\Explorer
Type: REG_DWORD
Name: NoClose
Value: 1

Wednesday, 4 December 2013

Ubuntu + Active Directory, enable normal users to edit network settings

I recently setup a Ubuntu Linux system using likewiseopen for AD integration, however I found that normal users (even if they had sudo rights) had the edit network connections options grayed out on the gui.

This however I found can be easily fixed by doing the following

edit: /var/lib/polkit-1/localauthority/10-vendor.d/com.ubuntu.desktop.pkla

and change:

[Adding or changing system-wide NetworkManager connections]
Identity=unix-group:admin;unix-group:sudo
Action=org.freedesktop.NetworkManager.settings.modify.system
ResultActive=yes

to:

[Adding or changing system-wide NetworkManager connections]
Identity=unix-group:admin;unix-group:sudo;unix-group:users
Action=org.freedesktop.NetworkManager.settings.modify.system
ResultActive=yes

Then in the terminal (using an account with sudo rights) do the following

sudo adduser ADOMAIN\\Ausername users

Where ADOMAIN is your domain name ie. if your FQDN is AD.linuxisgreat.com then you would put AD in place of ADOMAIN.

eg.

sudo adduser AD\\bsmith users

Finally logout and then login the changed account and the option to change network settings should now be active from the network icon in the system menu bar.

Tuesday, 29 October 2013

Power and Pi

Recently I purchased a raspberry pi to replace the rather aged and (compared to the Pi) power hungry Asus EEE box that monitors the UPS for my home server cluster.
Its worth mentioning that the EEE box used to host VMs as well, but its lack of resources (max 2 GB memory), eventually lost it that roll, in favor of other atom mini-boards that can handle 8GB memory etc.

The new

The old

Setting up the pi was quite straightforward as the Raspberry pi site http://www.raspberrypi.org/downloads has a downloadable OS installer/recovery image that you can write the SD card (that will hold the pi's OS).
Despite the quirky name (NOOBS) New Out Of Box Software, is actually a very good, well put together bit of software. The lite version is best as it takes the least space on the card and it provides and easy recovery path (hold shift during boot) to restore the system to a fresh clean build with out having to remove the SD card from the pi box/case should anything ever go wrong.
(Note the lite version of NOOBS is a net-installer which means the pi must be connected to the internet to install / restore an OS)

The OS I chose for this pi was Raspbian, Debian OS build created specifically for the pi. This was chosen as Debian was known to have arm builds of all the software I needed to keep an eye on the UPS.

I won't go into the install process here (there are plenty vids and documents on the web regarding this) but the instructions I based my UPS monitoring setup for the pi are available at http://raspisimon.no-ip.org/ups.php
(note I have no affiliation with the sites linked in this post I just made use of them)


Sunday, 15 September 2013

Pwnboxer and WoW 5.4 : Siege of Orgrimmar. Game windows not on correct monitors

Today I tried to get pwnboxer to run WoW 5.4, and run it did .... just not on the correct monitor(s) (all the game windows got piled up on top of one and other).

However a quick investigation turned up the cause of the issue. As of patch 5.4 WoW no-longer seems to respect the run in 32bit mode option Pwnboxer sends to it (something Pwnboxer currently needs it to do).

Rather it looks at your OS and goes 'oh this is a 64bit pc I'll use the 64bit client' even though it has been asked to run the 32bit client.

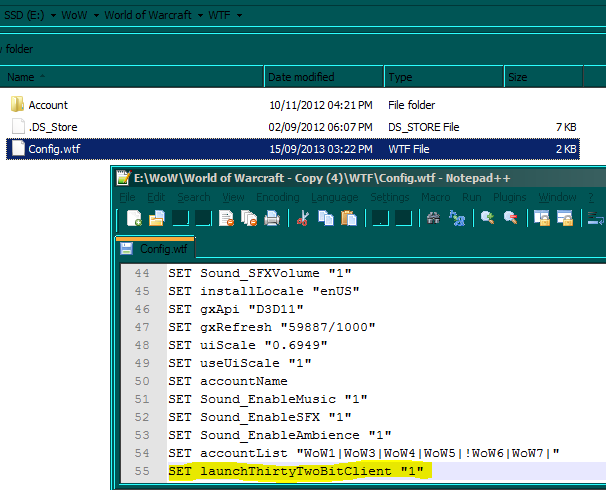
The fix to this however is quite simple first go to the 'WTF' directory under the wow directory and look for the 'Config.wtf' file, then add/amend the line below
SET launchThirtyTwoBitClient "1"


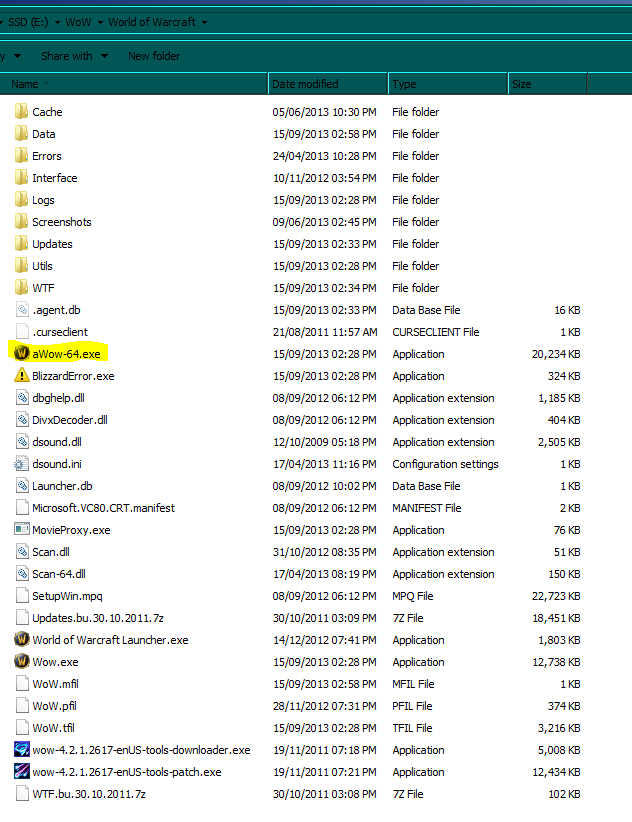
Then go to the main wow directory and rename the 64bit client from 'Wow-64.exe' to 'aWow-64.exe' that will stop the launcher trying to load it.


For more info, see the official forum post about the problem